Setup
This section describes how to setup the Data Gateway application for deployment via the Nerve Edge hosting platform.
Download
The latest version of the Data Gateway can be downloaded from the Nerve Software Center. The downloaded zip archive contains the Docker Compose file and all the docker image files.
Workload provisioning
When provisioning the workload, first the docker-compose.yaml file needs to be adapted (in some cases the file can be used without modifications). See Preparation for details.
After that the workload can be provisioned on the Management System. See Workload Details for more information.
Preparation
To use the Data Gateway with Nerve, a Docker Compose workload has to be created. All necessary files are included in the zip file that can be downloaded from the Nerve Software center. It includes:
docker-compose.yamlbroker.tarsupervisor.tarmqtt-client-handler.taropcua-client-handler.tar
Using the docker-compose.yaml file directly as downloaded provides a working version of the Data Gateway. However, in some cases the Docker Compose file needs to be modified before provisioning the workload. Those cases are the following:
- If the Management System registry is used (standard Docker Compose Workload since Nerve 2.10.0)
- If the Authenticity and Integrity check of the configuration should be enabled (see Configuration Authenticity and Integrity check for background information and Enable signature check on how to enable it via the
docker-compose.yamlfile) - If the Data Gateway should connect to another workload via an isolated network, it might be necessary to adapt the networks in
docker-compose.yaml. See Networking for details
Using the Management System registry is the preferred way to create workloads, but it only works if all relevant Nerve Nodes use a Nerve version 2.10.0 or higher. If this is not the case, the legacy storage option has to be used for the Docker Compose Workload. For legacy workloads the docker-compose.yaml file can be used as it is
For a registry workload, first load all provided images (.tar files) into your docker daemon, retag them and push them to the Management System registry. The process is described in detail in the Nerve Documentation. Adapt all images in the docker-compose.yaml file accordingly to use the tag of the images located on the Management System.
Example: Prepare docker images and docker-compose.yaml for a Data Gateway (registry) workload on the Management System https://ms.nerve.cloud
- Load the docker images from the downloaded files
docker load < broker.tar
... Loaded image: docker.tttech.com/datagate/broker:1.0.0

docker load < supervisor.tar
... Loaded image: docker.tttech.com/datagate/supervisor:1.0.0

docker load < mqtt-client-handler.tar
... Loaded image: docker.tttech.com/datagate/protocol-handler/mqtt-client:1.0.0

docker load < opcua-client-handler.tar
... Loaded image: docker.tttech.com/datagate/protocol-handler/opcua-client:1.0.0
- Login at the Management System Docker registry
# this will ask you for your credentials
docker login https://ms.nerve.cloud
... Login Succeeded
- Retag and push the images to the Management System registry (for the Management System registry all images must be pushed into the
/registryfolder or a subfolder of that)
# retag the images
docker tag docker.tttech.com/datagate/broker:1.0.0 ms.nerve.cloud/registry/datagate/broker:1.0.0
docker tag docker.tttech.com/datagate/supervisor:1.0.0 ms.nerve.cloud/registry/datagate/supervisor:1.0.0
docker tag docker.tttech.com/datagate/protocol-handler/mqtt-client:1.0.0 ms.nerve.cloud/registry/datagate/protocol-handler/mqtt-client:1.0.0
docker tag docker.tttech.com/datagate/protocol-handler/opcua-client:1.0.0 ms.nerve.cloud/registry/datagate/protocol-handler/opcua-client:1.0.0

# push the images to the registry
docker push ms.nerve.cloud/registry/datagate/broker:1.0.0
docker push ms.nerve.cloud/registry/datagate/supervisor:1.0.0
docker push ms.nerve.cloud/registry/datagate/protocol-handler/mqtt-client:1.0.0
docker push ms.nerve.cloud/registry/datagate/protocol-handler/opcua-client:1.0.0
- Adapt the image tags to the tags used by the registry images in the
docker-compose.yamlfile:
...
services:
    broker:
        # change
        # image: docker.tttech.com/datagate/broker:1.0.0
        # to
        image: ms.nerve.cloud/registry/datagate/broker:1.0.0
        ...
    supervisor:
        # change
        # image: docker.tttech.com/datagate/supervisor:1.0.0
        # to
        image: ms.nerve.cloud/registry/datagate/supervisor:1.0.0
        ...
    opcuaclienthandler:
        # change
        # image: docker.tttech.com/datagate/protocol-handler/opcua-client:1.0.0
        # to
        image: ms.nerve.cloud/registry/datagate/protocol-handler/opcua-client:1.0.0
        ...
    mqttclienthandler:
        # change
        # image: docker.tttech.com/datagate/protocol-handler/mqtt-client:1.0.0
        # to
        image: ms.nerve.cloud/registry/datagate/protocol-handler/mqtt-client:1.0.0
        ...
Workload Details
Once the docker-compose.yaml file has been prepared, and the docker images have been pushed to the registry (if a registry workload should be created), the actual provisioning can be done. Follow the basic guide from the Nerve Documentation. The outline is the following:
- Create a new Workload (if not already available). Make sure to choose the intended storage preference (
Management System RegistryorLegacy Storage) - Create a new workload version (or clone an existing version if available)
- In
Basictab:- Change the version name to the version identifier of the Data Gateway
- Upload the prepared
docker-compose.yamlfile (see Preparation)
- In
Registries and Servicestab:- Upload all docker image files accordingly if the workload uses
Legacy Storageoption - Set
Configuration Storagetosv_userconfig:.... This will allow the upload of the configuration once the workload has been deployed
- Upload all docker image files accordingly if the workload uses
- Save the new workload version
Configuration Authenticity and Integrity Check
To ensure that the configuration comes from a trusted source and has not been tempered with, the data Gateway allows to enforce an authenticity and integrity check via a digital signature file.
Concept
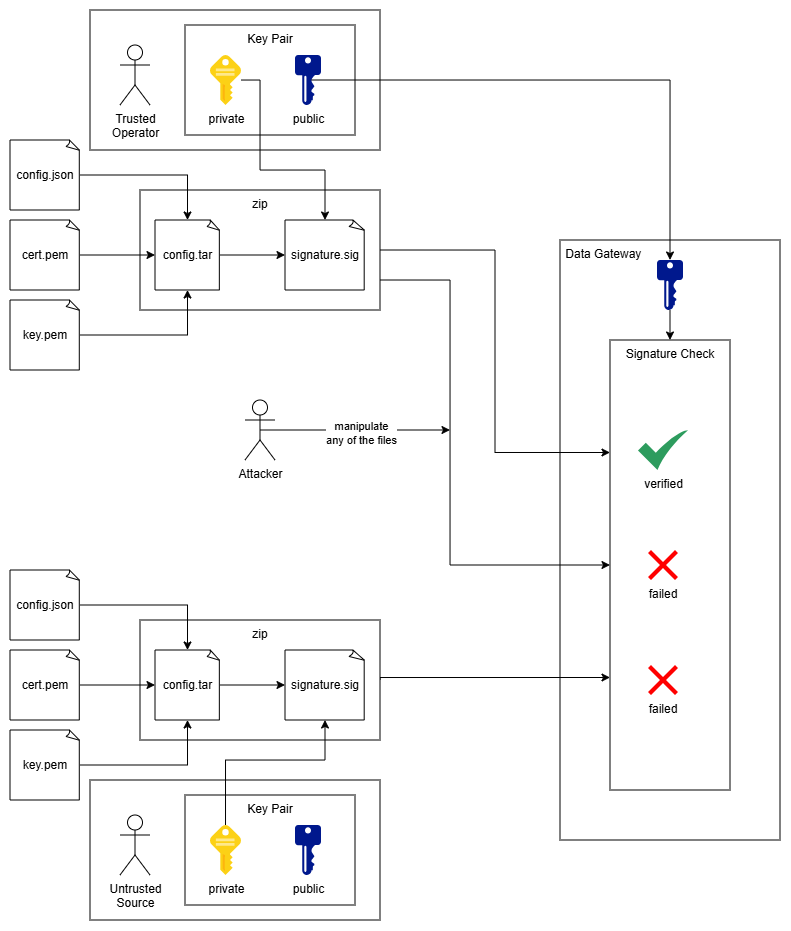
The signature and verification process uses a well established and state of the art concept that makes use of an asymmetric key pair. The following steps and diagram outline the workflow
- A trusted operator generates a key pair consisting of a private and a public key. The public key is passed on to the Data Gateway via the workload configuration.
- When a new configuration is created, the trusted operator creates a signature file by signing the configuration files with the private key
- The configuration and the signature are transferred to the Data Gateway
- Whenever the Data Gateway loads a configuration, it performs a verification by combining the public key, the signature file and the configuration files
- The check will fail either if any of the files have been modified after signing, or if the signature has not been created with the exact private key that corresponds to the public key used for verification
- The private key is sensitive information and must be stored safely and protected
- The public key can only be used for verification, not for signing so it does not contain any sensitive information and can be seen by anybody
Preparation and Algorithm
For verification the RSA signature algorithm is used with PKCS 1v5 padding and a SHA-256 hash. In order for the verification to work, the signature process needs to use the same parameters. This chapter outlines the steps necessary to setup signing and verification.
Create a key pair
The whole workflow is based on the use of a cryptographic RSA key pair with a private key for signing and a public key for verification. Even though a minimum key length of 2048 bit is considered secure it is recommended to use a key length of 4096 bit as decreased processing speed is not at all relevant in the context that it is used. A new key pair can be created e.g. with openssl
openssl genpkey -algorithm RSA -aes256 -out private.pem -pkeyopt rsa_keygen_bits:4096
This will also ask you for a password that will protect the private key from leakage and unintended use. Make sure to use a password according to state of the art password policies.
Once the private key has been generated, the public key can be extracted. To pass the private key to the Data Gateway workload, it needs to be in a form without PEM headers and without line breaks (base64 encoded). Here an example of how to extract the public key from the private key:
# just extract the public key from the private key file 'private.pem'
openssl rsa -pubout -in private.pem
# extract the key and strip PEM headers and line breaks on Linux (as expected by the Data Gateway)
openssl rsa -pubout -in private.pem | grep -v -- '-----' | tr -d '\n'
Enable signature check
By default the signature check is not enabled. In this case the configuration files can directly be packed into a zip file that can then be uploaded to the Data Gateway (see Apply Configuration). To enforce the signature check, the environment variable CONFIG_VERIFICATION_KEY needs to be set to the desired public key. The following form must be used for passing the public key to the application (see Create a key pair for an example how to extract the public key in the desired form):
- no PEM headers
- single line (no line breaks)
- base64 encoded
Once the public key is available in the correct form, it is passed to the Data Gateway by setting the CONFIG_VERIFICATION_KEY environment variable for the supervisor service in the docker-compose.yaml file accordingly. Here is the relevant part of the docker compose file:
...
services:
    ...
    supervisor:
        ...
        environment:
            LOG_LEVEL: INFO
            REST_SERVER_HOST: supervisor
            CONFIG_VERIFICATION_KEY: MIICIjANBgkqhkiG9w0BAQEFAAOCAg8AMIICCgKCAgEApVjWsho9+m1vPTW+oqzZN3mmV5JSNbNUVP0eNV2rdlaM86srIMC64vSNRKRe9bGJ3meDF4ojbiKlNaqLOnbyudyhMtx1qU3t0ZqZJc+UP3iMBaI9sWqEUyWkAqAnn+o/tmFvhAhCUAyorjHNBR2CzDbpGE2lc2DJysiG8r7Z0DAVXAihge2dtATsGT29kJPdcFOkJrV43Vrx2PE6k18vW9srRKYMneyKapyPnsasqAEEZ6+NfAGiGwbtJgZItkF+/Y8TJmFAtMCCGFsQyDF+2v6zPbta4FCx7wSDuxIuXI7naTTY98rFSI8QEzNNpgyYXAQ9xSN72THl2N8ojy4DlGkhTd4CqbiSvuinosixL+EpO+Al+BW9rlh1dEWoaOdrOJLnYPwIUO7thXRht2bttWzoQjb2qeeo1nig1TAS/vLXFDwtUHkbkfMGd+veEoebx5DB+sJVviEbGQsVxVMbleoUrFHpAAN3tvxOYR0p283AJz+1Y+Nd4fmuLnngzkjiRaTbCS0PKrwteHt/2M0oA7uTBBGmNinC/k89VqVG0iyMay8TglrE7QaouE7lJMjnf/Yd+geQxqn++qomBOlgALDyGlr5zJ2N/UwIwdWnOnXUg7+24p+mZ0I1+N3JIV0OMrSbT1WwfeIaAG9/AdrueNq3HTphBsR6Lds18euNpZcCAwEAAQ==
        ...