Configuration
The Nerve Data Gateway is configured via a single configuration file in JSON format. This file can be created using any text editor. Configuration Deployment outlines how to deploy this file together with any Supporting Files.
Supported Protocols and Data Types
The following is a list of protocols (and related features and data types) that are supported by the Data Gateway.
OPC UA
The Data Gateway supports the connection to one or multiple OPC UA servers to automatically fetch data via OPC UA polling and subscription models in OPC UA client mode.
Modes
The Data Gateway acts as an OPC UA client and supports the following (read-only) modes for data fetching:
- Polling (input)
- Subscription (input)
Writing or modifying data on the server is not supported. Also not supported is OPC UA PubSub.
Connection Parameters
For the connection to the OPC UA server the following concepts and policies are supported:
- Authentication with username and password
- Use of certificate and key files for encryption and endpoint verification
- Security modes
- None
- Sign
- SignAndEncrypt
- Security policies
- None
- Basic128Rsa15
- Basic256
- Basic256Sha256
- Aes128Sha256RsaOaep
- Aes256Sha256RsaPss
Addressing
With respect to addressing the data that should be fetched from the server, the Data Gateway implements the following behavior:
- Variables are addressed directly via standard OPC UA addressing (node id = namespace + identifier)
- Indirect addressing is possible, meaning that if an address points to a folder that holds multiple variables, the gateway will automatically browse the folder recursively and fetch all data within that folder
- Configuration allows choosing whether the display name or the node id of an addressed OPC UA node is used in later stages of the data flow. In case of name conflicts, the gateway will always use the unique node id for conflicting nodes
- Data is fetched based on availability. If a node that is addressed via the configuration is not available (does not exist, or in some kind of error state), this node will be ignored, and everything that is available will still be fetched (until the data becomes available again)
Data Types
The following data types are supported by the Data Gateway (if the configuration specifies a node id that points to a non-supported data type, it will be indicated in the logs and ignored for fetching):
- Boolean
- Sbyte
- Byte
- Int16
- UInt16
- Int32
- UInt32
- Int64
- UInt64
- Float
- Double
- String
- DateTime
- Arrays (of any of the above)
Not supported are e.g. custom structs.
MQTT
The Data Gateway can connect to one or multiple MQTT brokers to subscribe to or publish to topics. Currently only MQTT 5.0 is supported. MQTT 3.1 is not supported.
Modes
For MQTT, the Gateway supports the following concepts:
- Subscribe (input)
- Publish (output)
Connection Parameters
For the connection to the MQTT broker the following concepts and policies are supported:
- Authentication with username and password
- Use of certificate and key files for encryption and endpoint verification
- TLS
- None
- 1.2
- 1.3
- Last Will and Testament
Subscriber
The MQTT subscriber input supports the following concepts and features (this is not a full list - see Configuration File for details):
- Topic wildcards
+and# - Rate limit (max number of messages that can be received within a sliding 1 second window to avoid DoS attacks)
- Quality of Service 0-2
- Message formats
Publisher
The MQTT publisher output supports the following concepts and features (this is not a complete list - see Configuration File)
Configuration Deployment
The configuration is applied via the apply configuration mechanism provided by the Nerve platform. A full configuration always includes the config.json file. Depending on the configuration, additional certificate files might be provided as well. Depending on the security requirements, the configuration can be provided with or without a digital signature to ensure its authenticity and integrity. Those two different scenarios are explained below.
Authenticity Check disabled
If the Authenticity Check is disabled (see Workload Provisioning) the configuration file must be packed into a zip archive together with all necessary certificate and key files which is then uploaded via the apply configuration mechanism. The following notes must be followed when preparing the configuration:
- The configuration file must be named
config.jsonor otherwise it will be ignored. - The configuration file
config.jsonmust be located directly inside the zip archive and not within a subfolder inside the archive - Every certificate and key file that is referenced inside the
config.jsonmust be present in the zip archive with the same path as specified in the config file. - The name of the uploaded
zipfile does not matter
As mentioned, the supporting files such as certificates can be placed in subfolders (as long as they are referenced accordingly in config.json) while the config.json file must not be placed inside a subfolder.
Example: If inside the configuration file the certificate ./mqtt/cert.pem and the key ./mqtt/key.pem are referenced, then the zip file should look like this:

Authenticity Check enabled
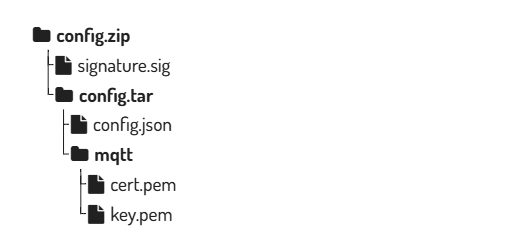
If the Authenticity Check is enabled (see Workload Provisioning) all the files (config.json + all supporting certificates and keys) must first be packed into a tar file. This tar file is then signed with the correct private key (detached signature). Lastly the signature and the tar file are packed into a zip archive which is then uploaded via the apply configuration mechanism. The following steps outline the procedure and the required structure:
- The configuration file must be named
config.jsonor otherwise it will be ignored. - Pack
config.jsonand the necessary certificate and key files into a tar archiveconfig.tar - The tar archive must be named config.tar
- The configuration file
config.jsonmust be located directly inside the tar archive and not within a subfolder inside the archive - Every certificate and key file that is referenced inside the
config.jsonmust be present in the tar archive with the same path as specified in the config file. - Sign the archive
config.tarwith the correct private key that corresponds to the public key that was used to enable the authenticity check (see Workload Provisioning)- The signature must be created detached with file name
signature.sigusing the RSA signature verification algorithm with PKCS v1.5 padding and a SHA-256 hash - Example for signing with openssl:
openssl dgst -sha256 -sign private.pem -out signature.sig config.tar - See Preparation and Algorithm for more background information and how to create a key pair
- The signature must be created detached with file name
- The
config.tarandsignature.sigfiles must be packed into a zip file (directly with no subfolders) which can then be uploaded. - The name of the zip file does not matter
- For secure operations, use a strict package layout and include only
config.tarandsignature.sigin the uploaded zip archive. - To avoid integrity gaps between signing and deployment, sign once and upload the exact same artifact bytes without repacking.
Example: If inside the configuration file the certificate ./mqtt/cert.pem and the key ./mqtt/key.pem are referenced, then the zip file should look like this: